Help Develop
When contributing to this repository, please first discuss the change you wish to make via issue, with the owners of this repository, before making a change. Each pull request must first be an issue.
Pull Request Process
- Fork the repository.
- Create a branch in your fork that matches the name of the issue you're working on.
- Add the new feature or fix.
- Run the unit tests and ensure that none fail.
- Submit a pull request from your forked branch back to the
devbranch of the repository. - Include the updated documentation in the pull request.
- The pull request will be reviewed, then merged into
devif all tests pass, the changes will be pushed to themasterbranch and a new versioned build will be made.
Note
Any new features require an accompanying unit test for it to be approved.
Getting Setup
Fork the BlenderTools repository.

Create a branch in your fork with the name of the task/issue you are working on.
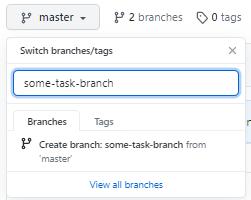
Clone your fork and checkout that branch:
git clone https://github.com/<your-username>/BlenderTools.git
cd BlenderTools
git checkout some-task-branch
Testing your changes
While developing, you will want to be able to rapidly test your new changes. You can do this by running this script in the Blender Script Editor.
Note
You need to change <your-repo-location> to match the absolute path to the scripts folder in your local project. Running this script installs and reloads the tool.
import bpy
import sys
sys.path.append(r'C:\<your-repo-location>\BlenderTools\scripts')
import dev_helpers

addons = ['send2ue', 'ue2rigify']

# installs the actual addons zips
#dev_helpers.reload_addon_zips(addons)

# reloads the code from your repo. A lot faster but doesn't load addon preferences
dev_helpers.reload_addon_source_code(addons)

# start blender and unreal rpc server for automated testing
#bpy.ops.send2ue.start_rpc_servers()
In most cases you can get away with running dev_helpers.reload_addon_source_code, which reloads very fast and any stack traces get linked back to the repo code.
However, the true test is running dev_helpers.reload_addon_zips this actually zips up the code and installs the addons. You will need to do this if you are testing features that rely on properties in the addon preferences.
bpy.ops.send2ue.start_rpc_servers() Ensures that both unreal and blender rpc servers are running. This is needed if you want to run the unittests on the open app instances.
Hot reloading from PyCharm
These steps must be completed in-order for the addons to hot-reload while you type in PyCharm.
- If you have the addons already installed, uninstall them and shutdown Blender and PyCharm.
- You must symlink the addon folders into the blender addon installation location. Then enable the addons
Windows
Run this from a commandline launched as administrator. Swapping out the last path with your own.
mklink /D "%APPDATA%\Blender Foundation\Blender\3.4\scripts\addons\send2ue" "D:\repos\BlenderTools\send2ue" - You must install the
./scripts/addon-watcher.xmlin Pycharm by going toSettings > Tools > File Watchers > Import - And finally blender has to be running with the send2ue addon enabled and clicking
Pipeline > Utilities > Start RPC ServersNow PyCharm should reload your addons on file save events.
Code Structure
This is how the addon code is structured. You will see this primary file and folder structure in each of the addons.
.
├── ...
├── send2ue             # The root folder for the plugin
│   ├── core            # This folder contains all the core logic of the tool.
│   ├── dependencies    # This folder contains dependencies that have been added into the tool.
│   ├── resources       # This folder contains templates, settings, and extensions.
│   ├── ui              # This folder contains all UI classes for the tool.
│   ├── __init__.py     # This contains the plugin and initialization and uninitialization calls for all operators, properties and events.
│   ├── constants.py    # This file holds hard coded values that the tool utilizes.
│   ├── properties.py   # This file contains the property data definition for the tool. All tool properties should live in here.
│   └── operators.py    # This file contains all operator class definitions. This serves as the entry point to all logic that lives in the core module.
└── ...